Etabs Model Creation
A secondary, but extremely useful function of Tribli is the rapid creation of Etabs models from scratch or from PDF markups. This article will run through a common workflow for the creation of Etabs models in Tribli.
-
Create the Tribli model geometry as per the load calculation workflow, noting that overlapping slab regions should be avoided when intending to export to external engineering software
-
The model could be exported to Etabs at this point, however it is usually worthwhile performing a few valuable alignment functions before proceeding with the export.
As Tribli uses the concept of column and wall chains, it is not necessary to ensure columns and walls are perfectly aligned from one level to the next, however it is usually desirable to set-up Etabs models with elements aligning between level. The below are some suggested alignment functions to consider before exporting to Etabs:- Straighten Column Chains: Use the column straightening functions on some or all column chains to ensure that all columns in a chain are perfectly aligned at all levels.
- Straighten Wall Chains: Use the wall straightening functions on some or all wall chains to ensure that all walls in a chain are co-planar with each other. This is vital for correct analysis in Etabs.
- Connect Walls: Ensures that wall element end nodes are snapped together if they are within a given tolerance of each other. This tolerance can be adjusted in the Tribli settings.
- Make Walls Co-linear: Will ensure that all selected wall chains are co-planar. Useful for ensuring that multiple walls will be visible on the same elevation view in Etabs. Optionally, walls can be snapped to the orthogonal X and Y axes.
- Vertically/Horizontally Align Chains: Ensures a consistent X or Y coordinate between all selected column chains. Useful for ensuring that multiple columns will be visible on the same elevation view in Etabs.
- Orthogonalise Slabs: Snaps nearly-vertical and nearly-horizontal slab edges to be perfectly vertical or horizontal. Helps to avoid Etabs analysis errors.
-
Although area loads can be exported to Etabs directly, it is often cleaner to set-up uniform load sets in Etabs and apply them directly to the slab shell elements. Tribli offers a useful function to easily slice slabs along boundaries of different loading regions so that the loads can be easily applied in Etabs. See the slice function summary for further details.
-
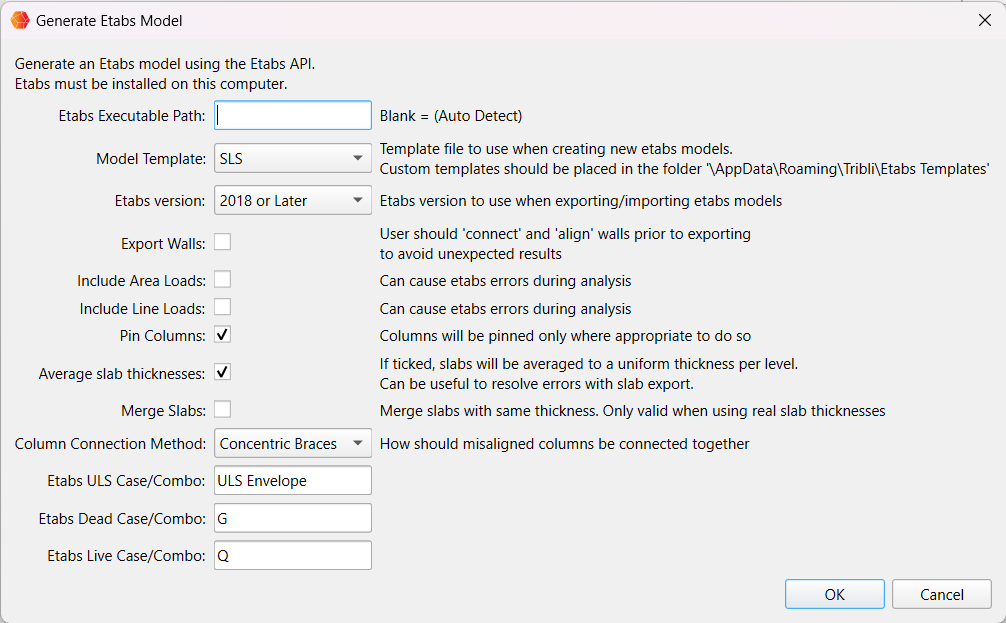
Once happy with the model, select Etabs Model -> Via API from the Export menu. The below dialog will be shown:

- Etabs Executable Path: Can generally be left blank. If Tribli is having trouble connecting to the Etabs API, try inputting the path to the Etabs executable file here.
- Model Template: Defines the Etabs template that the model will be exported to. There are two built-in options (SLS and ULS), however the user may specify their own Etabs template files by copying .edb files into the Tribli Etabs template folder.
- Etabs Version: Leave as '2018 or Later'
- Export Walls: Select this option to export walls to Etabs. For this function to be useful, the user should ensure that the walls are aligned prior to export.
- Include Area Loads: Select this option to export area loads to Etabs. If the slab falls entirely within a given area load, the load will be applied to the slab shell in Etabs directly, otherwise the area load will be input as a loaded null shell element.
- Include Line Loads: Select this option to export line loads to Etabs. Line loads are exported as loaded null frame elements.
- Pin Columns: If selected, columns will be pinned at their top and bottom. Columns will remain torsionally fixed.
- Average Slab Thicknesses: If selected, a single shell element will be exported per level. The thickness of the element will be set at the average of all slab thicknesses at that level.
- Merge Slabs: If selected, adjacent slabs of matching thicknesses will be merged prior to exporting to Etabs
- Column Connection Method: Defines the method used to connect mis-aligned columns in the same chain. 'Concentric Braces' means that a diagonal brace element is used to define the columns in the Etabs model. The brace elements will not appear in the Etabs plan views. 'Rigid Links' means that all columns will be input at vertical column elements in Etabs, and misaligned columns will be connected by rigid link elements at slab level.
- Etabs ULS Case/Combo: Not currently used
- Etabs Dead Case/Combo: Etabs load case to which dead loads will be exported
- Etabs Live Case/Combo: Etabs load case to which live loads will be exported
Select 'OK' to export the model to Etabs.